
Software Reverse Engineering is the process through which one attempts to understand a program’s functionality by analyzing its code. In this blog (part 1 of the “Intro to Software Reverse Engineering” series), we’ll delve into Reverse Engineering x86 Windows applications. OllyDbg is the tool we are going to utilize for x86 binary analysis and debugging.
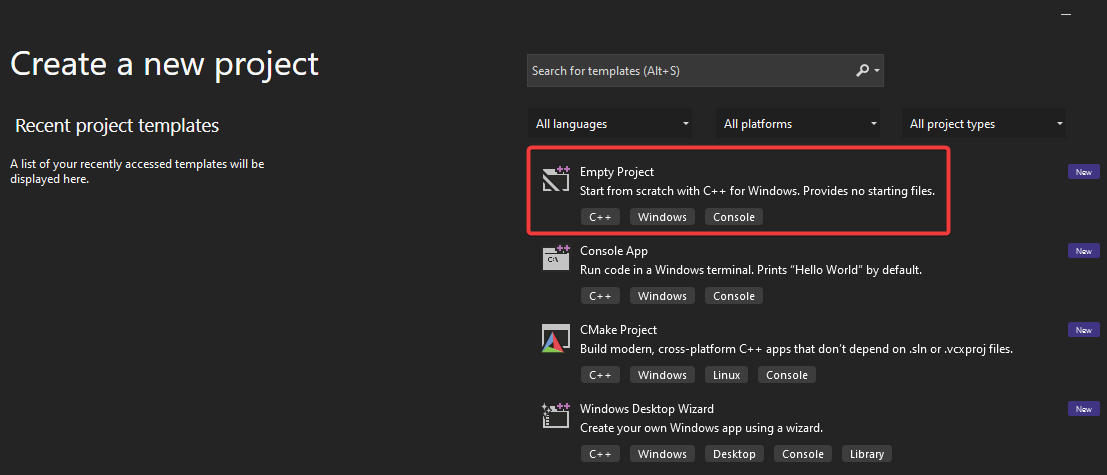
We’ll be using C code from LiveOverflow’s GitHub repository for this blog. Giving the source code might be contradictory, but during the initial stages of learning, it can be quite useful. The code can be compiled with Microsoft Visual Studio with some extra steps. To compile C programs in VS, first install the required “Desktop development with C++” feature. Next, create an Empty C++ project.
Right click on source files, add a new item and rename its extension to “.c”

Add the GitHub code to this file, change the highlighted part in the screenshot below to Release and x86 and compile the code.
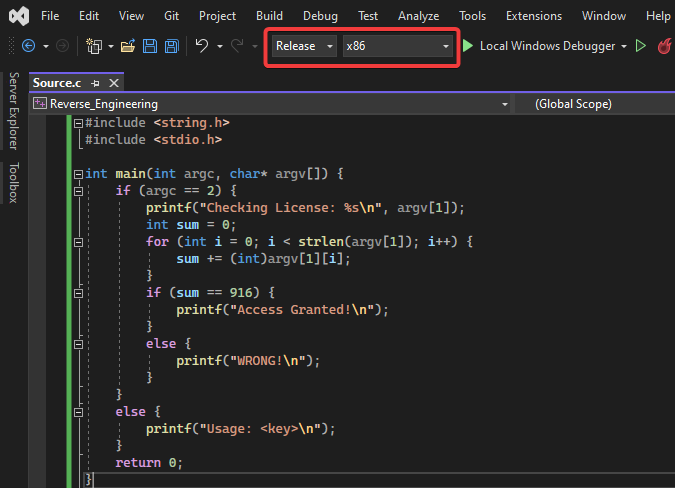
Let’s quickly go through the above code and understand it before proceeding further.
if (argc ==2)
The above snippet checks if the number of arguments is 2. If it passes, the rest of the code is executed. Otherwise, the usage statement gets printed.
for (int i = 0; i < strlen(argv[1]); i++) {
  sum+= (int)argv[1][i];
}
The above snippet takes the second argument, which in this case is the license key (the first argument is the binary name), iterates through the string, converts the character to its respective ascii integer, adds and stores the integers in the sum variable.
if(sum==916) {
  printf("Access Granted!\n");
}
else {
  printf("WRONG!\n");
}
This snippet compares sum variable (which contains the ascii integer sum of all characters) to 916; If it’s equal, then print “Access Granted”, otherwise print “Wrong”.
We now have an idea on what the program actually does.
Now, let’s assume to have no prior knowledge about the algorithm behind the compiled binary, and proceed to Reverse Engineer it as we would an unknown application.
First, we’ll try running the binary on a command prompt.
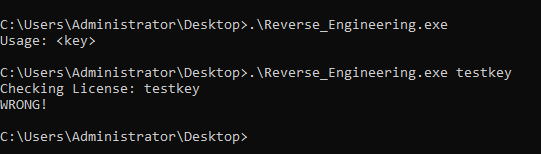
It runs as expected. The binary asks for a key and performs some algorithm behind the scenes to validate it. Let’s now dig deeper into the binary.
Load the binary on OllyDbg by either dragging the binary and dropping it on OllyDbg or by opening OllyDbg and navigate to File > Open and open the compiled binary. After opening it, OllyDbg is in the paused state and should look like the screenshot below.

From running our binary earlier, we observed that an argument needs to be supplied. We can add arguments to our binary on OllyDbg on navigating to Debug > Arguments.
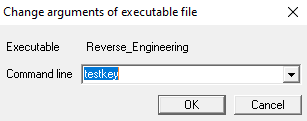
After adding an argument, the program needs to be restarted by navigating to Debug > Restart.
This default view OllyDbg is the CPU window. The CPU window can also be brought up by clicking on the “C” icon on the toolbar. In the CPU window, we can see the assembly instructions that the CPU execute line by line, the contents of the different x86 CPU registers (x86 as this binary was compiled for x86 architecture), a memory dump section and also the stack memory. We will not be going into detailed x86 assembly programming in this blog for the sake of brevity. That said, we’ll go through some relevant parts of assembly code. There are a lot of instructions on this binary which we are not interested in. We’ll need to find out where the validation of the license key occurs so that we can inspect it more closely. One method would be to go through each instruction step by step. Another easier method would be to search for referenced strings. We have observed earlier that the binary prints a “WRONG!” message if the key is incorrect. Strings which are referenced by the binary can be viewed on OllyDbg by right clicking the main window > “Search for” > “All referenced text strings “.
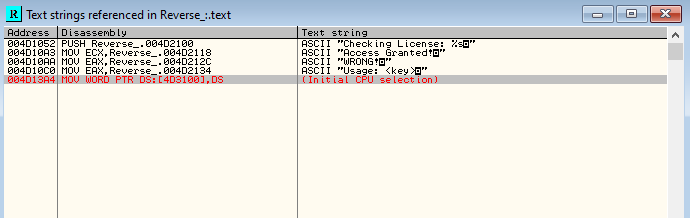
We find some referenced strings relevant to us. We can view the CPU assembly instructions referencing these strings by double clicking them. For now, we’ll double click on the “Checking License:” string and scroll up a bit.

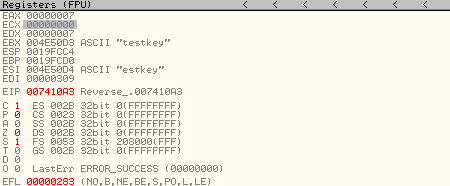
We observe that on address 004D104F, arg2 is being pushed to the stack. We can put a software breakpoint here by clicking on the line and pressing F2. We’ll now restart the program again and click on run. The program execution should now stop at address 004D104F. We can see the ascii “testkey” as arg2 pushed into the stack.

On address 004D105C, this argument is moved to the EBX register to be used for further algorithms.
On the referenced strings windows, we’ll double click on the “Access Granted!” string and scroll up a bit.

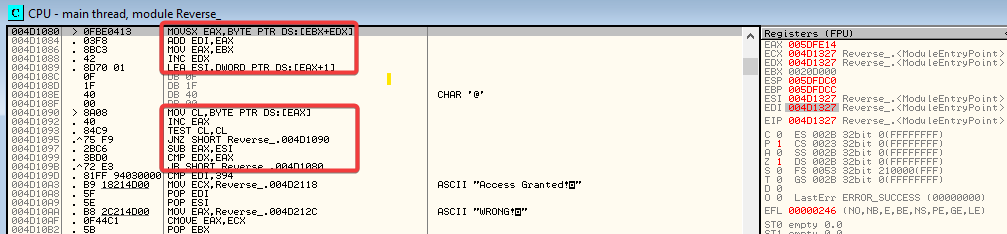
On inspection of these highlighted instructions, we observe that its part of a loop which iterates through each character of the entered argument, adds and stores the ascii integer value of the character to EDI register. EDX register acts as the control variable. To view this in detail, we can also set breakpoints and go through each instruction one by one.
After coming out of the loop, we can see a compare instruction CMP EDI,394 (address 004D109D on the screenshot above) which compares the value of EDI with hexadecimal 394 (916 in decimal).
Set a breakpoint at the CMP instruction and restart the program. Once the breakpoint has been reached, observe the value of EDI register, which would be 309.
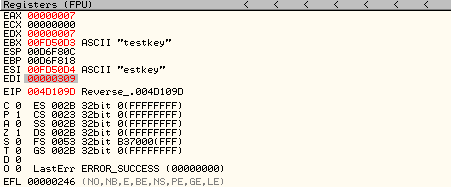
Now, step over the instruction with F8. Notice that the C and S flags on the registers view are now 1 because the CMP compare instruction compares hex 309 and hex 394 and sets these flags as 1 because they are not equal.
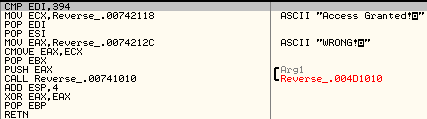
The next instruction moves the address with reference to the “Access Granted!” string to ECX. After that, the address with reference to the “WRONG!” string is moved to EAX. Keep pressing F8 until the `CMOVE EAX,ECX` instruction is reached. This instruction checks the previous compare result from the C flag and if it is set, does not move ECX value to EAX, i.e., EAX still contains the reference to “WRONG!”. If the previous CMP instruction had succeeded, the C and S flags would have been 0, the CMOVE instruction would have succeeded and EAX would have now contained the reference to “Access Granted!”. This is the string which will get printed to the console in the call instruction that follows. We now know that we need to make the comparison successful by modifying our argument to make the sum of its ascii characters equal to hexadecimal 394 (916 in decimal).
The string “testkey” has an ascii sum of decimal 777, we’ll have to append an ‘E’ (ascii 69) and ‘F’ (ascii 70) to from ‘testkeyEF’ (an ascii sum of 916).
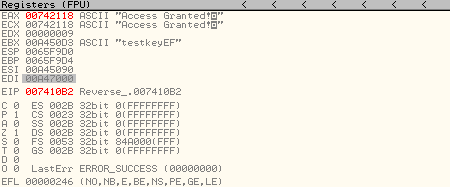
We can modify the argument in OllyDbg by navigating to Debug > Arguments again and restart the binary.
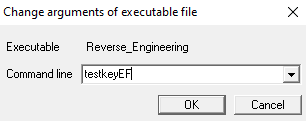
When we hit the Breakpoint at `CMP EDI,394`, observe that the register EDI has the value 394 now. Step over that instruction and notice the values of the C and S flag (which were 1 on the previous run) are now 0.
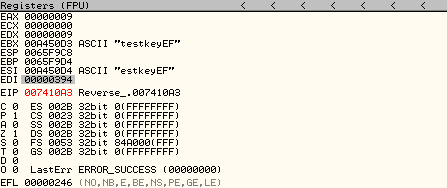
Now, on stepping over the CMOVE instruction, the EAX register now has the reference to “Access Granted”.
Let’s now try this new key as argument to the binary on a new command prompt.
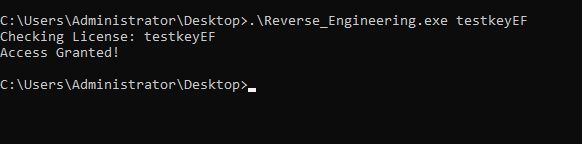
The “Access Granted!” string gets printed! We have successfully Reverse Engineered the binary and bypassed the license key restriction. Keep in mind that this was a very basic binary with a relatively simple validation algorithm and no Reverse Engineering protections. We’ll go into more detail on the topic of Reverse Engineering and do some writeups (part 2, part 3) on reversing challenges as well in upcoming blogs.
By partnering with Redfox Security, you’ll get the best security and technical skills required to execute an effective and thorough penetration test. Our offensive security experts have years of experience assisting organizations in protecting their digital assets through penetration testing services. To schedule a call with one of our technical specialists, call 1-800-917-0850 now.
Redfox Security is a diverse network of expert security consultants with a global mindset and a collaborative culture. With a combination of data-driven, research-based, and manual testing methodologies, we proudly deliver robust security solutions.
“Join us on our journey of growth and development by signing up for our comprehensive courses, if you want to excel in the field of cybersecurity.”